Shipping Setup
How to change Ship Method Settings
-
Go to the Administration tab on the left and then click on the Settings menu option.
-
In the upper right tool bar click on Accounting Settings.
-
From the Accounting Settings screen, click on Modify Shipping Settings in the third column.
-
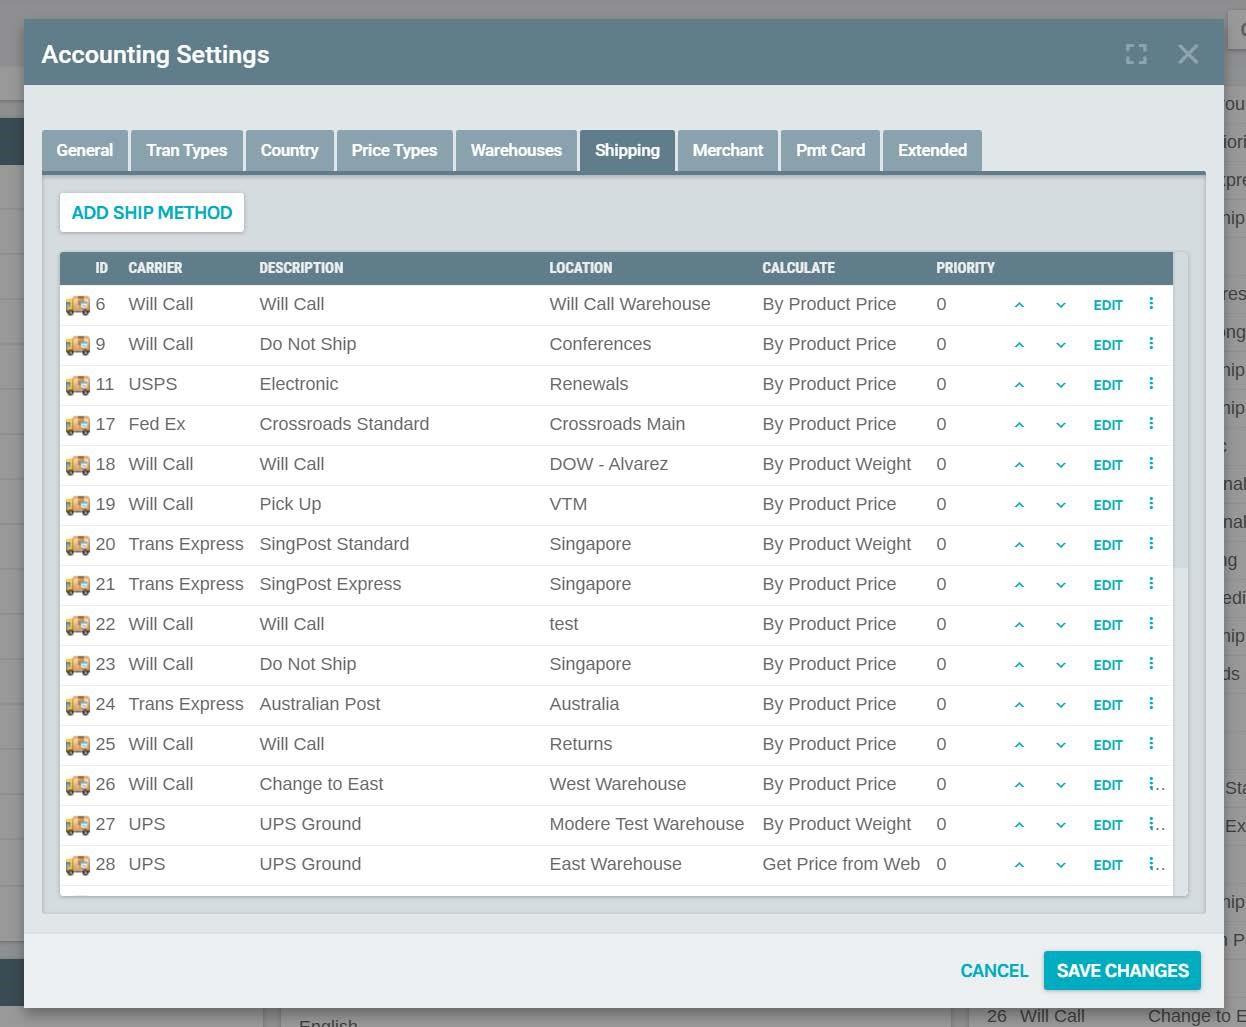
From the Accounting Settings popup, go to the Shipping tab:
-
To modify the ship method setup, click EDIT on the ship method that you wish to modify.
EDIT
You will now see the following screen for the selected Ship Method.
Description: The name of the ship method that will be displayed on the web site and on the order
invoice.
Carrier: The carrier used to ship via this ship method so that the system knows which website to go to
when a tracking number is used to track an order from the Admin Customer Screen or the Distributor
back office. Please note that carrier USPS and Will Call will not link to any website when an order is
tracked.
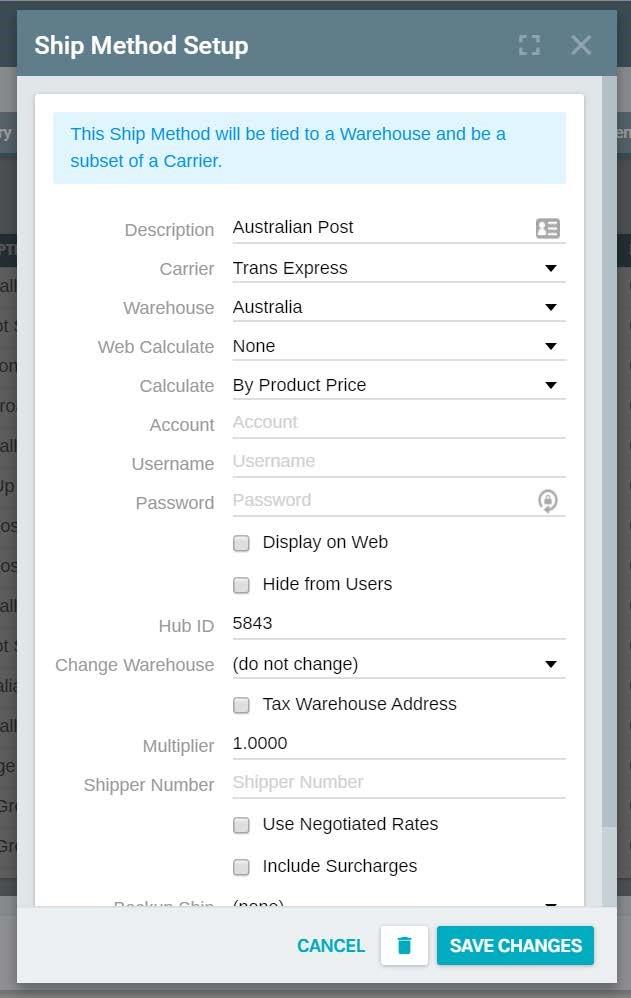
Warehouse: Select the warehouse that this ship method belongs to. Only websites configured for this
warehouse will have the option to use this ship method.
Calculate: Select which method to use for determining the shipping rates/costs.
- By Product Price - a static schedule is used to setup the pricing based on the price of an order.
The SOP (ship on price) values of an item or all items on the order is used to determine the price
of an order. The rate range editor then can be used to setup the shipping rules.
- By Product Weight - a static schedule is used to setup the pricing based on the weight of an
order. The weight value of an item or all items on the order is used to determine the overall
weight of an order. The rate range editor then can be used to setup the shipping rules.
- Get Price from Web - a dynamic method used to determine real time rates for UPS or FedEx. The
origin (warehouse) address, the ship to address, the total weight of the order and the class of
service (see web calculate) is passed to the Carrier via their API and then the rate is returned.
Please note that this method works only if your carrier can validate the ship to address, otherwise
they will return a zero rate value. (see Backup Ship Method below). Please make sure the
Location warehouse address is setup correctly.
Web Calculate: The level/class of service to use when Get Price from Web is used.
Account: Provide your account number for UPS or FedEx if you plan to use Get Price from Web. Please
note that you can use the Exigo UPS account to get published rates even though you may want to ship
using FedEx.
UserName: Provide your username for UPS or meter number for FedEx if you plan to use Get Price from
Web.
Password: Provide your password for your UPS account. The FedEx API does not require this value.
Display on Web: True/False flag. If True, then the ship method can be displayed on the website. If False,
then the ship method can only be used internally by customer service.
Change Warehouse: Dynamic warehouse change method if you want to setup a Will Call method for
Warehouse A shopping cart, but have the order stored in Warehouse B for will call management.
Tax Warehouse Address: True/False flag. If true, then the taxes for an order are based on the warehouse
address, not the ship to address of the order. Please make sure the Location warehouse address is setup
correctly. If false, then the ship to address of the order is used to determine taxation.
Multiplier: If you are using Get Price from Web, then you can increase the amount of the rate returned
from FedEx or UPS. A value of 1 means that you multiply the rate by 100%. A value of 1.2 means that you
increase the rate by 20%. If you need to reduce the rate, a value of .8 would then be reducing the returned
rate by 20%.
EDIT RATE RANGE
Shipper Number: If you have a shipper number for your UPS or FedEx account and do not want to use
the Standard Published rates, you can enter the account number here for rates specific to your company.
You will need to use the "Use Negotiated Rates" flag.
Use Negotiated Rates: True/False flag. If true, then the discounted rates for your company are used
instead of standard published rates. If false, then the standard rates are used.
Backup Ship Method: If you are using the Get Price from Web calculation method and the ship to
address cannot be validated by UPS or FedEx, you may want to specify a ship method that is using a static
calculate method (by product price or by product weight) so that a value of zero is not used for the
shipping charge.
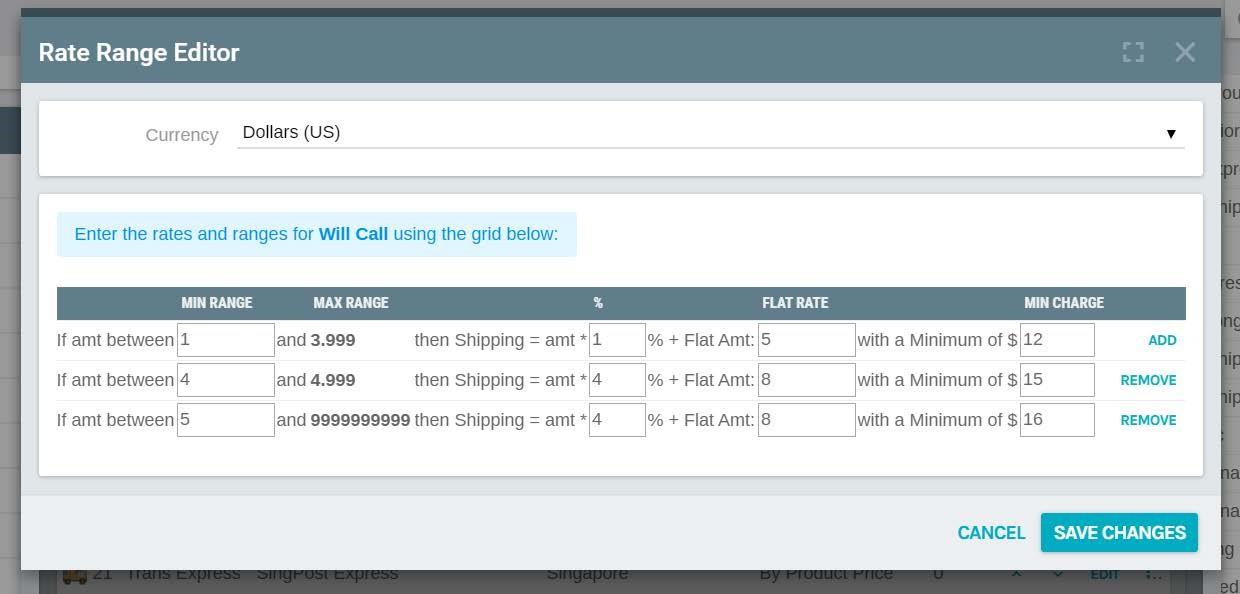
To make changes to the static rates setup for Calculate By Product Price or Calculate by Product
Weight, click on the ellipses to the right of the desired ship method, then click on Edit Rate
Range.
You may now configure your schedule (based on price or weight) for how you want to charge Shipping.
Other helpful information
To get your own account, you will need to contact UPS or Fedex to obtain the developer credentials you
would need to use these API's.
Here is an example of how to get a FedEx account:
You will need to go to FedEx and setup developer credentials for their Web Services API following the
Internal Company Use method at http://www.fedex.com/us/developer/web-services/index.html
You will need to create a New User account and get the credentials because it uses your company's
account number and there is an End User License Agreement to agree to as part of the credential process,
we cannot do this for you. Once you register and get the login information, you will then need to login to
the Developer Resource Center at www.fedex.com/developer. There is a semitransparent "Login" box on
the upper left corner of the page.
After logging in you will see a landing page with different FedEx technologies to code with. Click on the
left menu option "FedEx Web Services" and follow the instructions for "Your Application Is for Internal
Company Use Only". When you get to the Move to Production step, you should be able to Obtain a
Production Key. Use your FedEx account and address information in the registration boxes. Include
address entered on this page). When you receive the Production Key you will see a popup browser that
echoes back the FedEx Production Account number, an assigned Production Meter number and part one
of a two-part authentication key, called the "Key". You will then get an email with the same account and
meter number and the second part of the authentication, the "Password". In case you end up with some
kind of error, you can call their WIS Production Support Desk at 877-339-2774. Say "API" at the voice
prompt and tell the technician you are having trouble creating your Production Credentials for Web
services.
IMPORTANT: You will need to get the following information from FedEx so we can put your values in the
(Exigo) fields: FedEx Account Number (Account), Production Meter Number (Shipper Number),
Authentication Key (UserName), Hub ID (Hub ID)* and Production Password (Password).
*The Hub ID is needed if you plan to use Smart Post.