Invoice & Statement Setup
This document provides a step-by-step guide for managing Invoice and Statement templates in the Exigo Admin portal.
Overview
Invoice & Statement Setup allows administrators to define the layout, appearance, and content of the printed and emailed invoices that customers receive for their orders, as well as the recurring (auto-order) statement templates used for scheduled/subscription orders. Each template controls everything from the header and footer, the ship-to and payment information, the line items displayed, order totals, and per-warehouse settings.
Two categories of templates are configured in the same section:
- Invoice & Statement Setup — Templates used for standard one-time orders.
- Recurring Template Setup — Templates used for recurring (auto-order) statements.
Accessing Invoice & Statement Setup
Navigation Path
- Log in to the Exigo Admin portal.
- Navigate to Administration > Settings.
- Select the ACCOUNTING SETTINGS tab.
- Scroll down to the Invoice & Statement Setup section.
Viewing Existing Templates
The Invoice & Statement Setup section lists all configured invoice templates for one-time orders. In the example shown:
| Template Name | Purpose |
|---|---|
| Order Main | Default invoice template used for standard orders |
| VAT Example | Example template with VAT-specific configuration |
Click any template name to open the template editor, or click ADD INVOICE STATEMENT TEMPLATE to create a new one.
Directly below, the Recurring Template Setup section lists templates used for recurring/auto-orders (e.g., the default Auto Order Main). Use ADD RECURRING STATEMENT TEMPLATE to create additional recurring templates.
Editing an Invoice Template
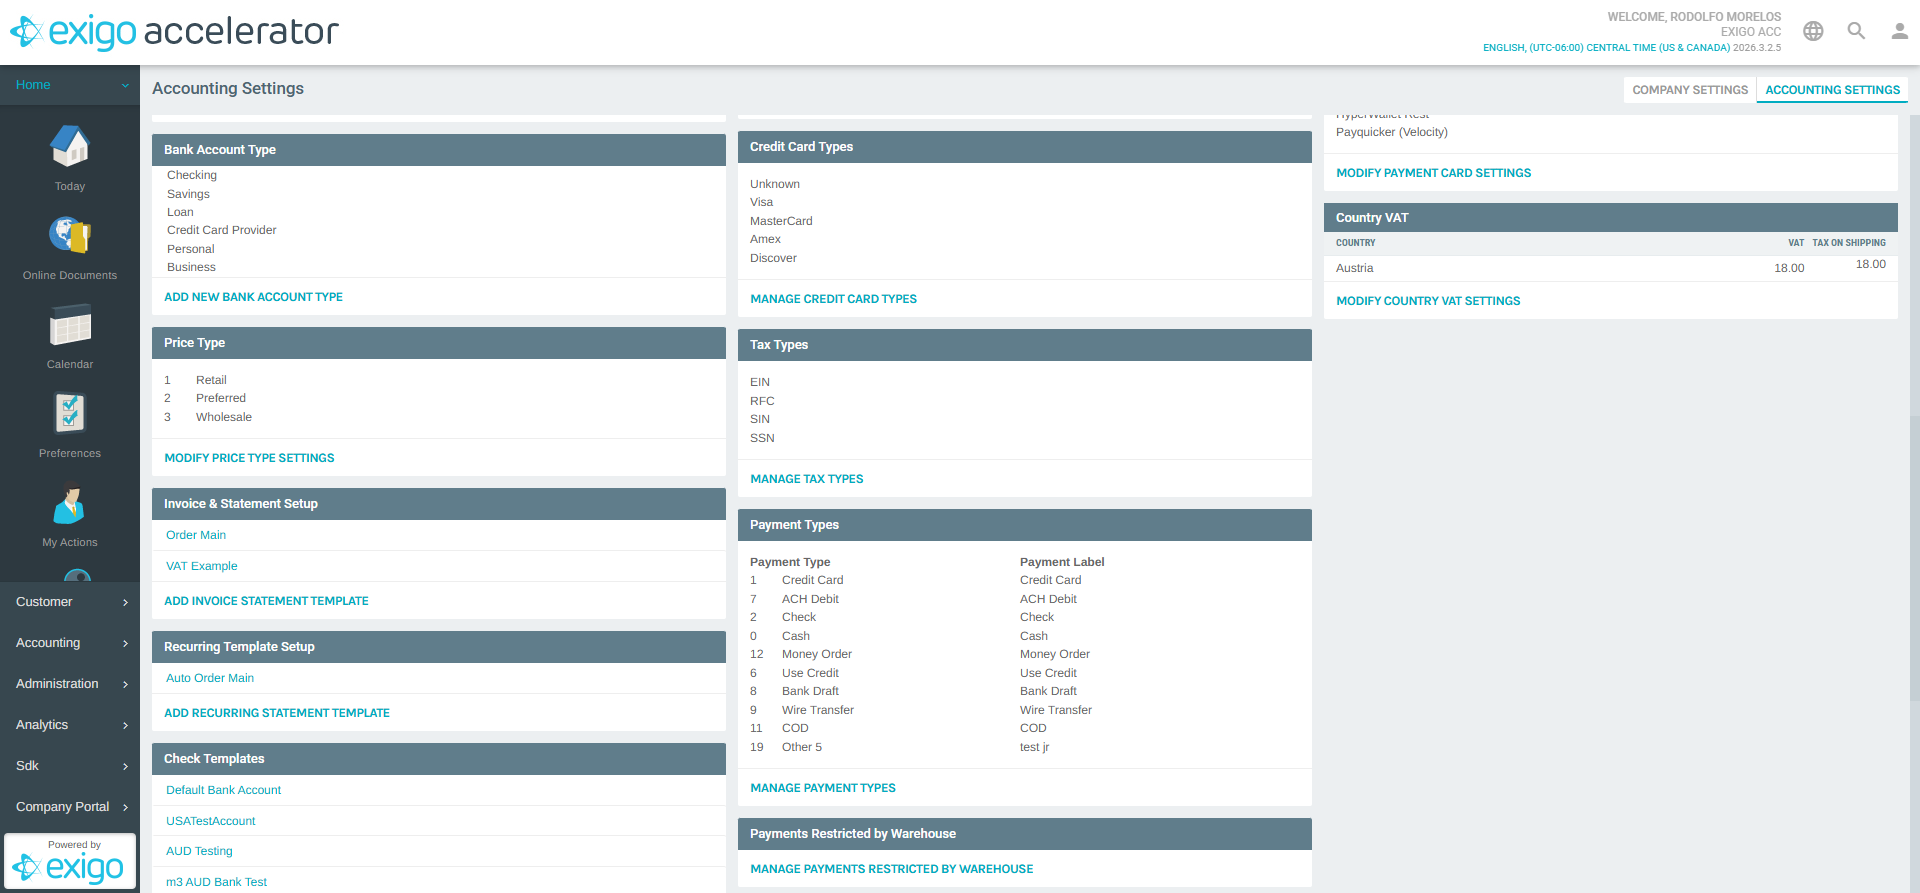
Click a template name (e.g., Order Main) to open the General Layout Options popup. The editor is organized into seven tabs:
- Layout — General template properties, display flags, bar codes, header, and footer.
- Ship To — How ship-to address information appears on the invoice.
- Order Info — Which order-level fields are shown.
- Payment Info — Which payment-related fields are shown.
- Order Items — Columns and formatting for the line-item grid.
- Order Totals — Which totals and taxes to display and how to label them.
- Warehouse Setup — Per-warehouse template assignments and delivery options.
Use SAVE CHANGES to persist changes, CANCEL to discard, or the delete link to remove the template.
Layout Tab
The Layout tab controls general presentation of the invoice. Key fields include:
- Template Description (required) — The name used to identify the template throughout the admin portal.
- Show Ship To as — Label shown above the ship-to block (e.g., "To", "Ship To").
- Show Order Info as — Label for the order information block (e.g., "Order Info").
- Show Payment Info as — Label for the payment information block (e.g., "Payment Info").
- Show Ship Method as — Label for the shipping method.
- User Defined Field — Dropdown selector for an optional user-defined field to include on the invoice.
Display toggles let you control what appears on the printed invoice:
- Show UPS Bar Codes
- Show Grid Lines
- Show Payments
- Show Order Notes
- Show Border
- Show Ship Method below Bar Code
- Show User Defined Field below Bar Code
The Top Bar Code and Bottom Bar Code sections let you configure the position, alignment, height, and rotation of the barcodes printed on the invoice.
Rich-text Header and Footer editors (powered by TinyMCE) allow you to customize the top and bottom content of the invoice, including fonts, formatting, tables, images, and horizontal rules.
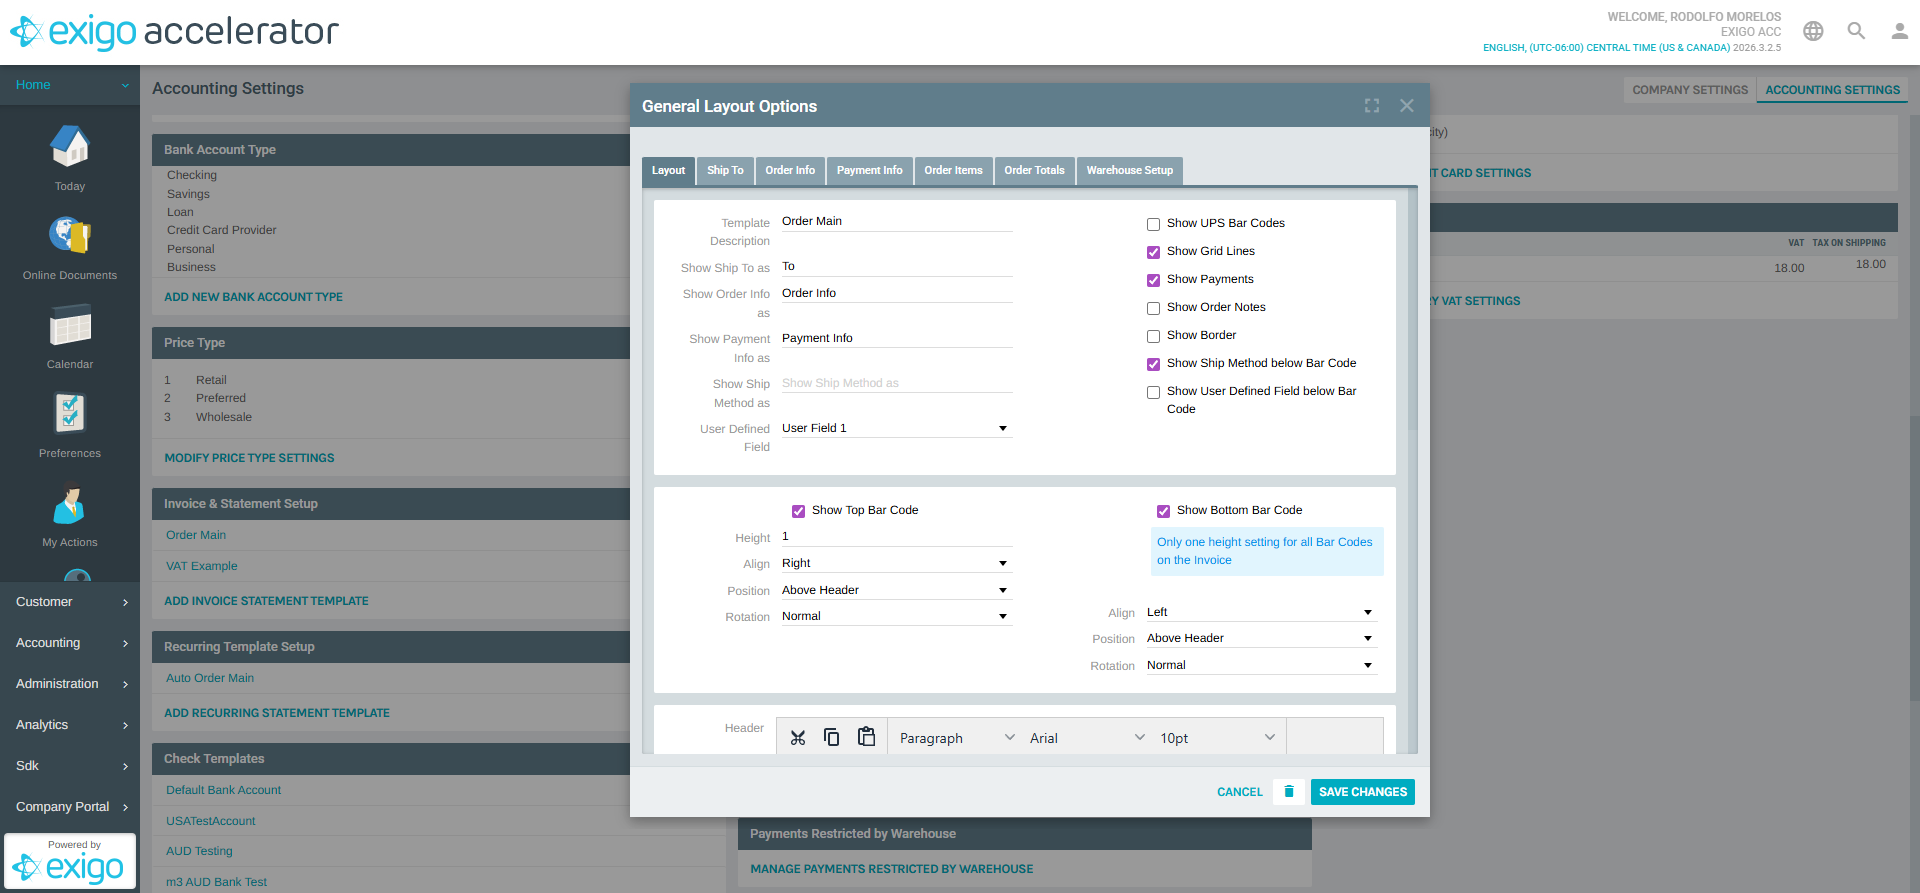
Ship To Tab
The Ship To tab controls which address fields appear in the ship-to block of the invoice, how they are labeled, and the order in which they appear.
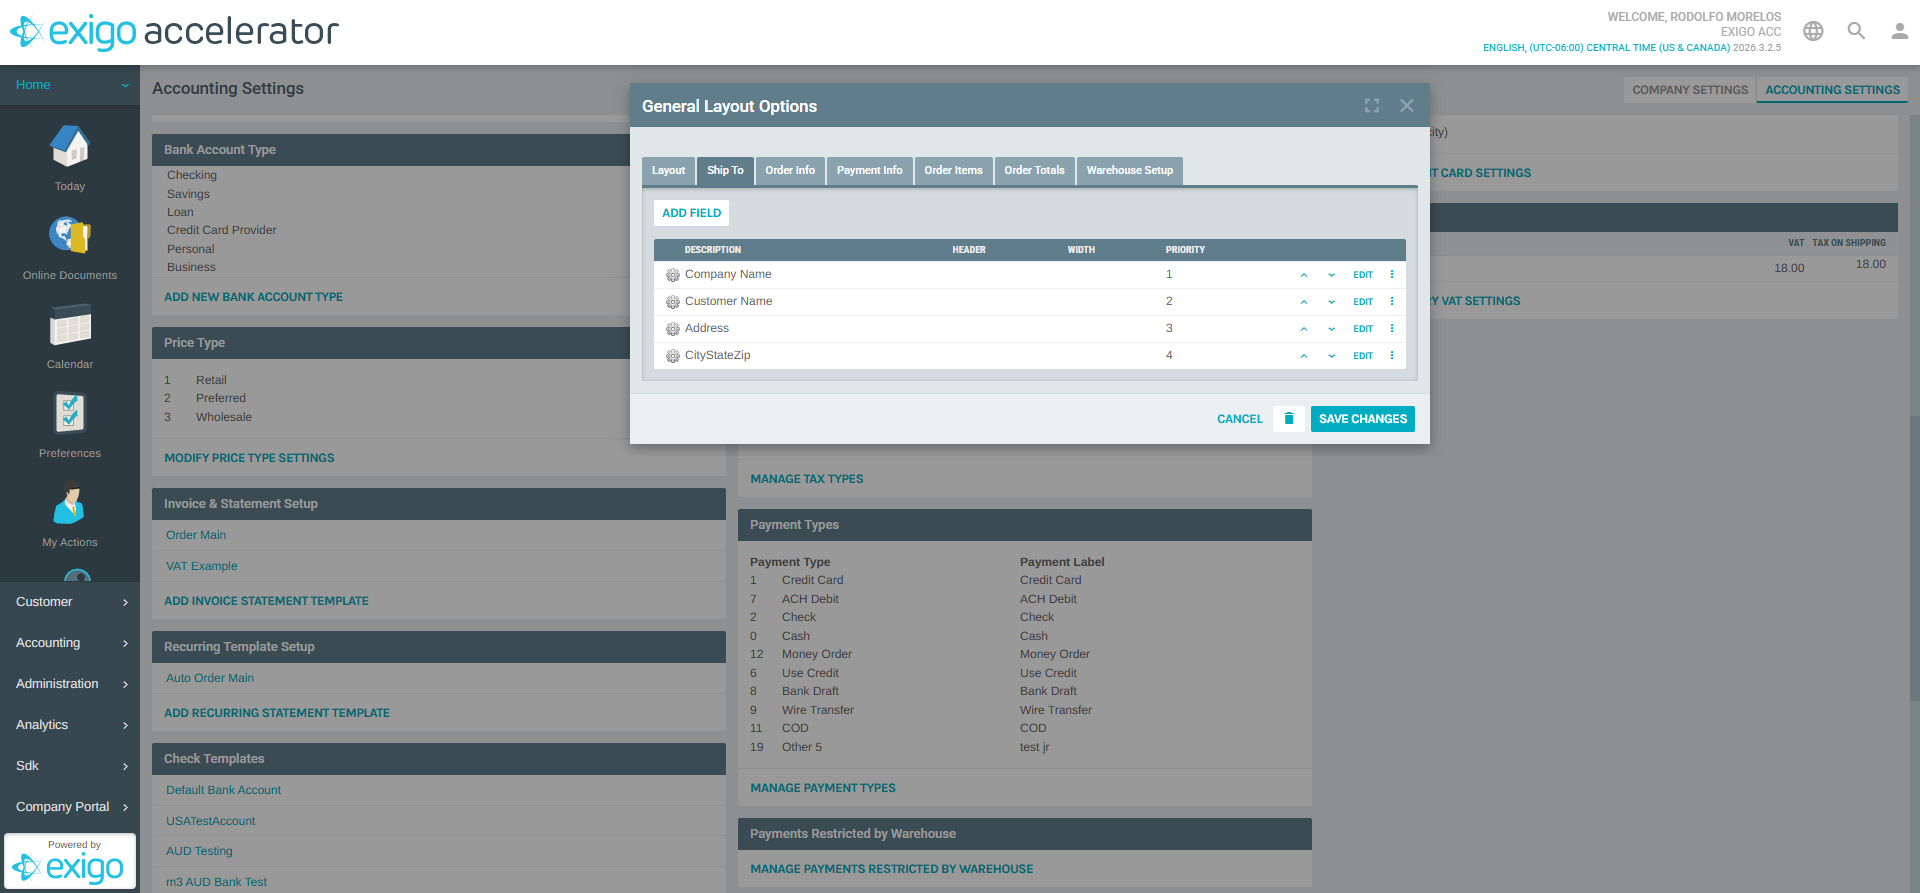
Order Items Tab
The Order Items tab defines the columns displayed for each line item on the invoice. Each field entry has:
| Column | Description |
|---|---|
| DESCRIPTION | Internal name of the field (e.g., Quantity, ItemID, Price) |
| HEADER | Label shown on the printed invoice |
| WIDTH | Percentage width of the column (e.g., 10%, 60%) |
| PRIORITY | Display order (1 = leftmost) |
Default fields for the Order Main template are:
| Description | Header | Width | Priority |
|---|---|---|---|
| Quantity | Quantity | 10% | 1 |
| ItemID | ItemID | 10% | 2 |
| Description | Description | 60% | 3 |
| Price | Price | 10% | 4 |
| Total | Total | 10% | 5 |
Use ADD FIELD to include additional columns, and use the EDIT and more_vert controls to modify or remove existing fields. The up/down chevrons next to each row let you re-order the columns.
Warehouse Setup Tab
The Warehouse Setup tab lets you associate the template with specific warehouses. This determines which invoice template is used when an order is placed against a given warehouse, allowing for per-warehouse branding, address formatting, or legal text.

Adding a New Invoice Template
To create a new invoice template:
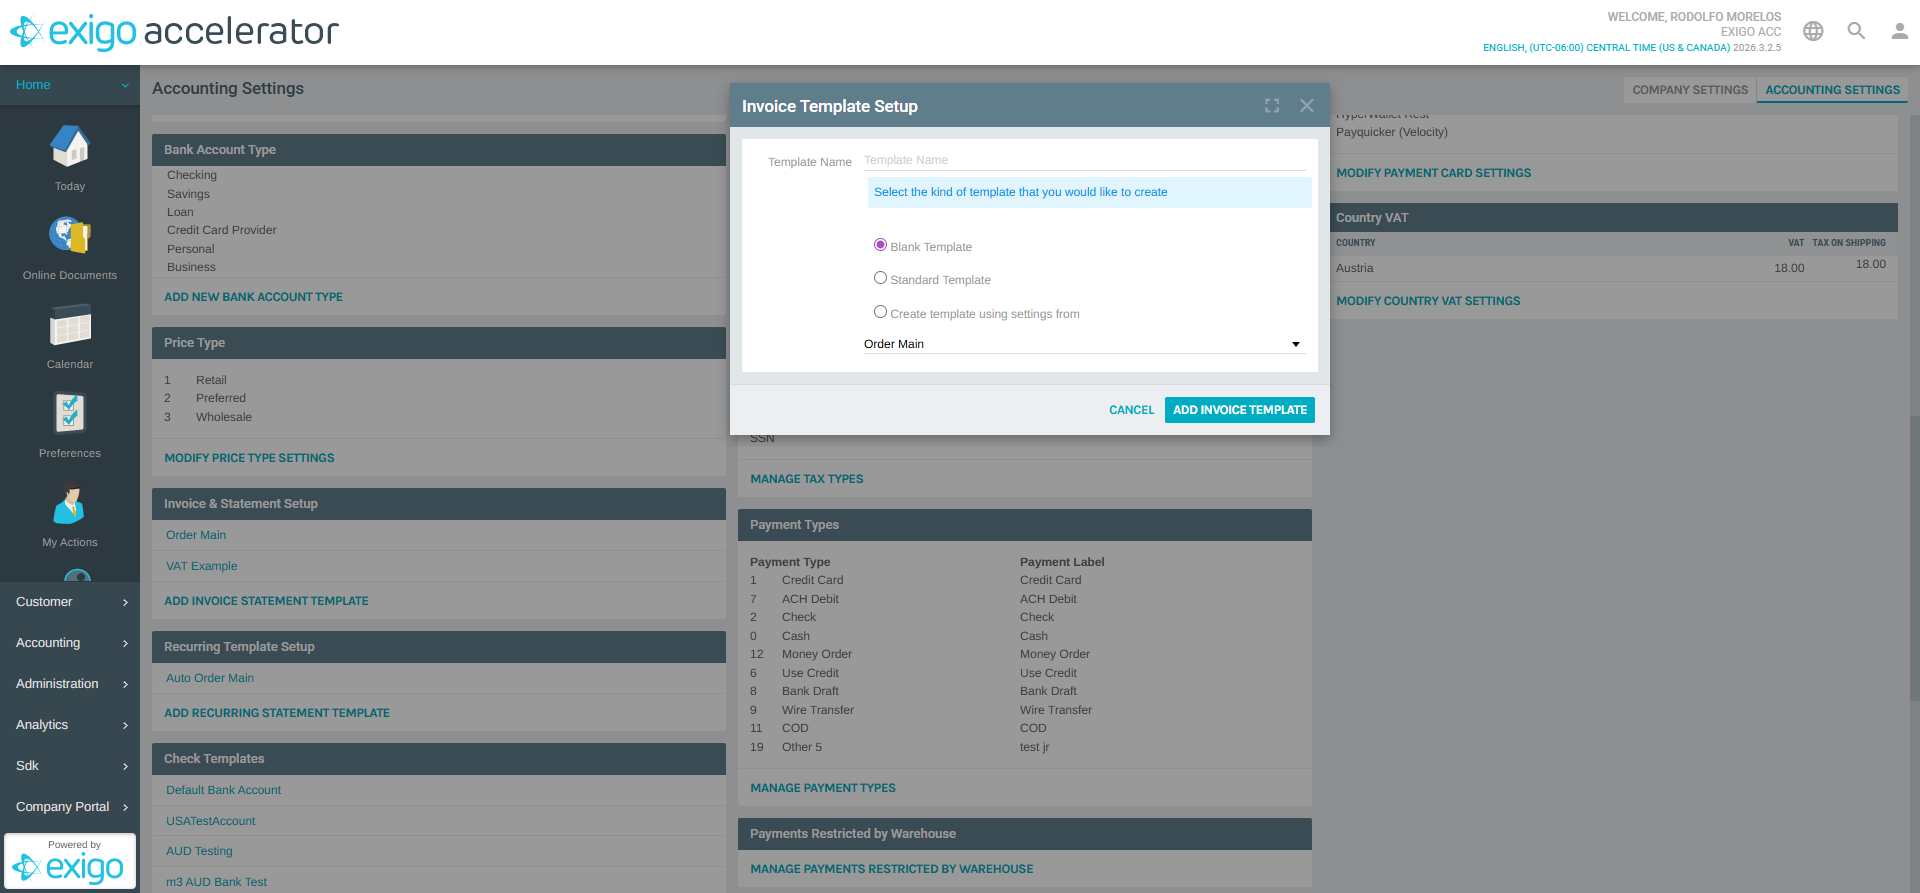
- Click ADD INVOICE STATEMENT TEMPLATE in the Invoice & Statement Setup section.
- The Invoice Template Setup dialog appears with the following fields:
- Template Name (required) — The name for the new template.
- Select the kind of template that you would like to create — Choose one of the starting points:
- Blank Template — Start from scratch with no preconfigured fields.
- Standard Template — Begin with Exigo's default invoice fields and layout.
- Create template using settings from — Clone an existing template (selected from the dropdown, e.g., Order Main).
- Click ADD INVOICE TEMPLATE to create the template, or CANCEL to abort.
After the template is created, it opens in the General Layout Options editor (see Editing an Invoice Template) so you can refine the Layout, Ship To, Order Info, Payment Info, Order Items, Order Totals, and Warehouse Setup tabs.
Adding a New Recurring Statement Template
Recurring templates are configured the same way as invoice templates but appear on auto-orders (recurring orders).
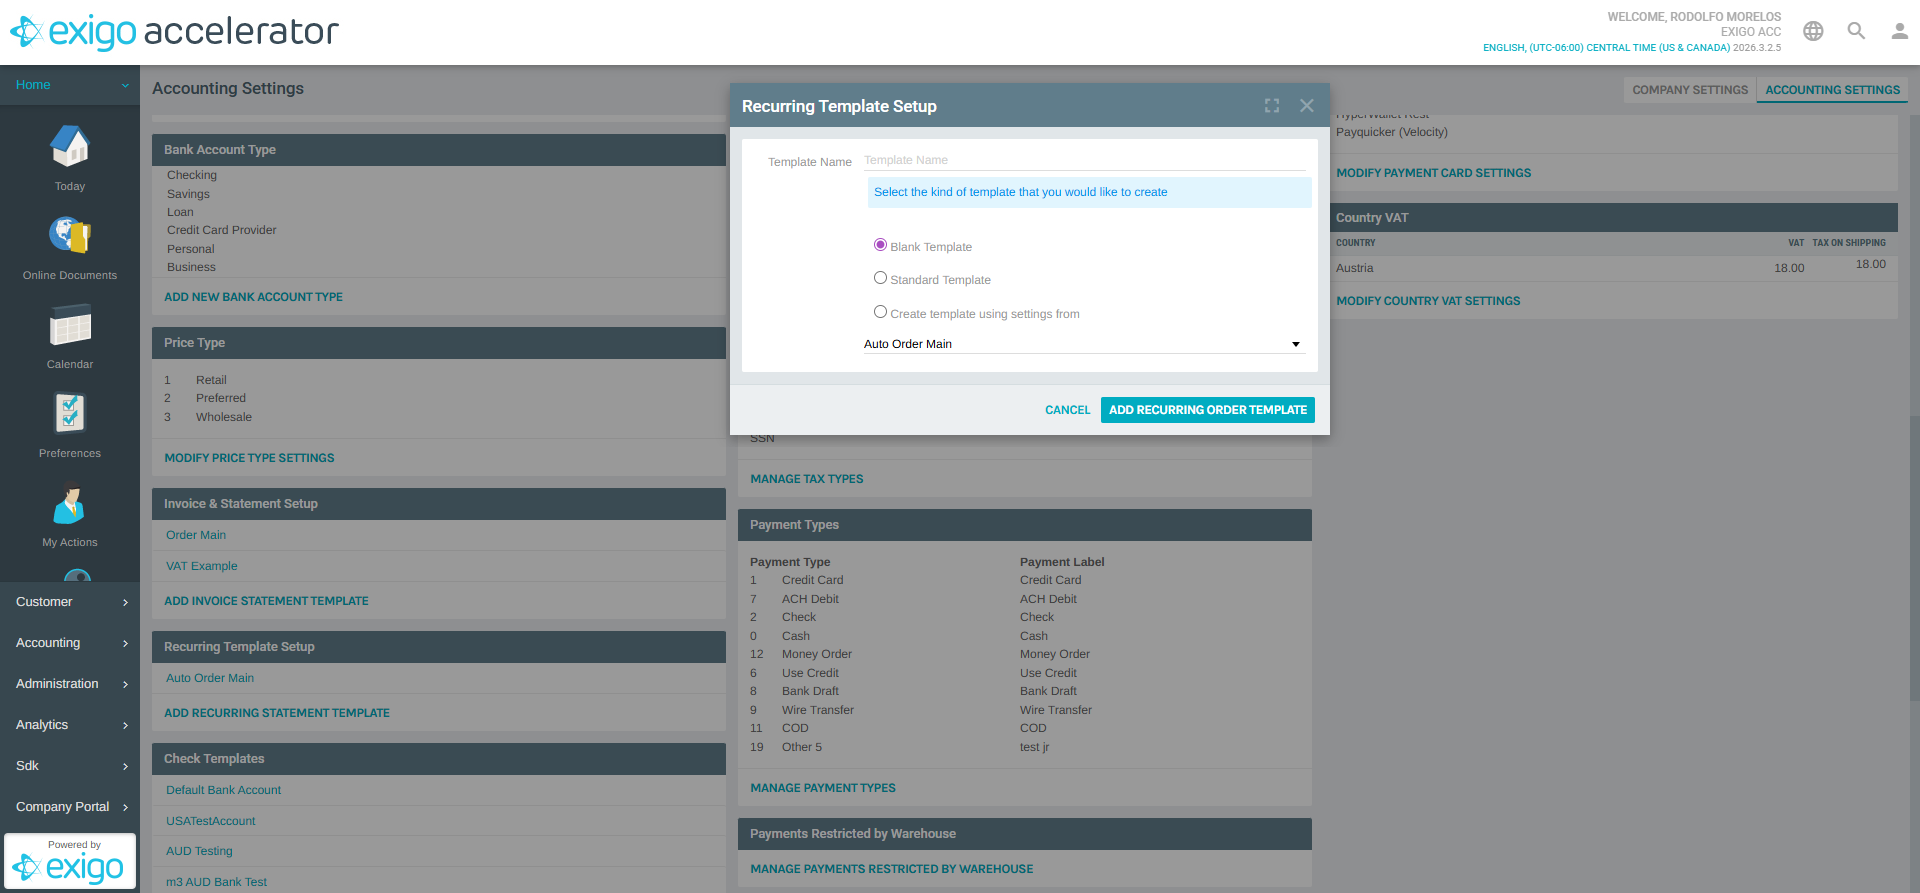
- Scroll to the Recurring Template Setup section.
- Click ADD RECURRING STATEMENT TEMPLATE.
- The Recurring Template Setup dialog appears with the following fields:
- Template Name (required) — The name for the new recurring template.
- Select the kind of template that you would like to create — Choose a starting point:
- Blank Template
- Standard Template
- Create template using settings from — Clone an existing recurring template (e.g., Auto Order Main).
- Click ADD RECURRING ORDER TEMPLATE to create, or CANCEL to abort.
Best Practices
- Clone a working template (using the "Create template using settings from" option) when you need a minor variation — this is faster than configuring a new template from scratch and reduces the chance of mismatched formatting.
- Keep the Template Description meaningful (e.g., "US Retail Invoice", "EU VAT Invoice") so administrators can quickly identify the correct template when assigning it to warehouses.
- Use the Warehouse Setup tab to route different templates to different warehouses — useful for multi-region setups where invoices must show different legal text, VAT, or branding.
- Test the printed output after making layout changes by generating a sample invoice from an existing order to confirm that the headers, footers, barcodes, and columns render as expected.
- Maintain a VAT-specific template separately from the standard template when selling into jurisdictions that require VAT line-item breakdowns (see the included VAT Example template).
Related Concepts
- Warehouses — Each invoice template can be assigned to specific warehouses. See Setting up Warehouses for more details.
- Bank Accounts — Check templates (for printing commission checks) are defined separately in the same Accounting Settings page.
- Recurring Orders — Recurring templates are used when auto-orders generate invoices on a scheduled basis.
System Notes
- Invoice & Statement Setup is located at Administration > Settings > Accounting Settings > Invoice & Statement Setup.
- Two template categories are managed on the same page: one-time invoices (Invoice & Statement Setup) and recurring/auto-order statements (Recurring Template Setup).
- The rich-text Header and Footer editors support HTML, inline images, tables, fonts, colors, and merge fields.
- Templates are stored at the company level and apply to all orders in that company unless overridden by a warehouse-specific assignment.