Admin Sandbox Management
Exigo Admin
OVERVIEW
WHAT IS A SANDBOX?
A Sandbox is a copy of your live database connected to a sandbox interface that you can login to. The
sandbox environment may be used for testing data updates, supporting API changes/ new development
and training new users. The sandbox data represents a snapshot in time. Changes made in a sandbox will
not affect your Production data.
SANDBOX TIERS
Larger workloads call for higher performing environments. Whether you are testing new
calculations or rapidly testing new features, Sandbox environments will now allow the ability to
scale up resources to match your needs. General level tiers are available that match your base Exigo Service
Level (Nano, Standard, Enterprise). You are also able to scale into even more performance with our
Premium Enterprise tiers (Enterprise 2, 4 and 6)! You will have the option to customize which Sandbox
needs more horsepower and allows you to scale back the ones that need to be more available without the
added overhead.
*As a note, General tiers will be priced capped as they are today, Premium tiers will be billed at the rate displayed on the
tier. Once you have gone into a Premium tier, you will not be able to scale back into a General tier.
IS THERE A COST TO USE THE SANDBOX?
Yes, the charge is based on when you start or stop the use of a specific sandbox. You can view the usage in
the Exigo Admin at Company Portal > Sandbox > Click "View" on the necessary Sandbox. Pricing details are
available per your contract or in the Exigo Admin at Company Portal > Sandbox > Click "View" on the
necessary Sandbox.
HOW DO I GET ACCESS TO CREATE/MANAGE A SANDBOX?
Your User account will need to have permission to access sandboxes (see below). Please contact your local
Exigo Administrator or the necessary person within your company to have this access enabled.
* For Administrators: To add sandbox permissions in admin, navigate to Administration > Users>Select User > Modify User Details >
grant the user access to Company Portal > Sandbox. You may also search for the word "Sandbox" in the provided User Permissions
search bar.
STARTING A SANDBOX
HOW DO I CREATE A SANDBOX?
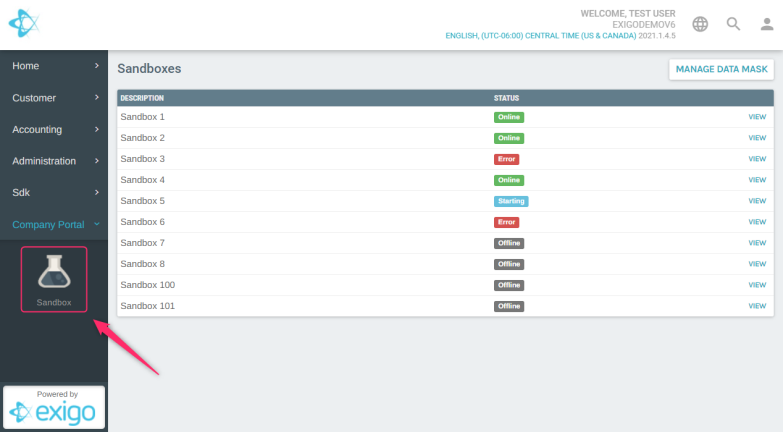
Once access has been provided by your local Exigo Administrator, the Sandbox menu interface can be
accessed directly in Exigo Admin under the Company Portal section on the left side of the screen.
From this menu, select the Sandbox option. Once here, you can see the available Sandboxes and their
status on the page display.
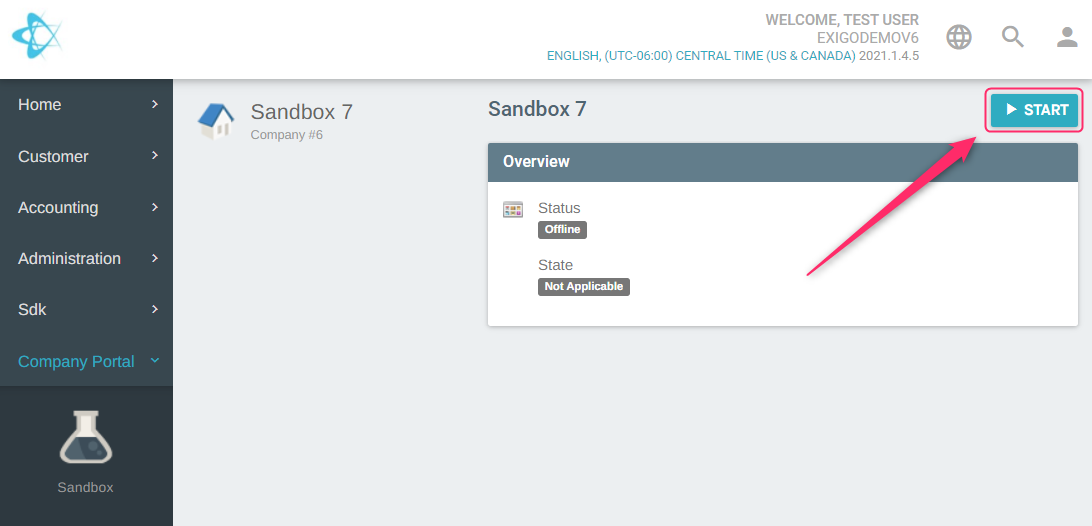
To configure and turn on the Sandbox follow these steps:
1.Select your Sandbox tier:
Identify which Sandbox you would like to use (not currently showing online) and click "View".
On the following page click "Start" in the top right corner.


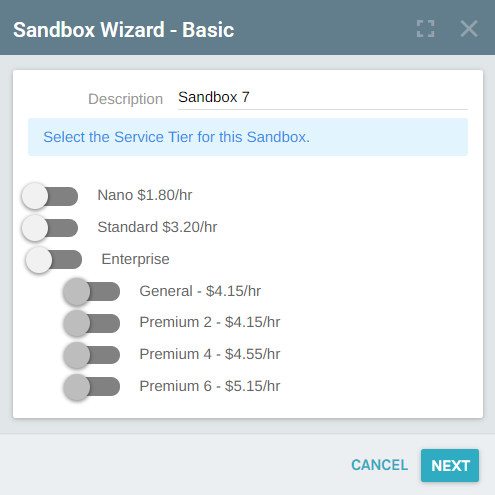
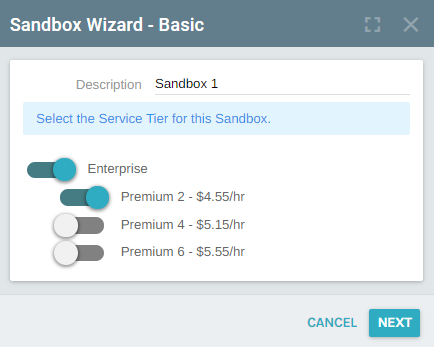
2. Name your Sandbox and assign the necessary resources to it
2.Name your Sandbox and assign the necessary resources to it
On the following screen assign a Description for your new Sandbox. Next select the service level based on
your business needs.
Click the "Next" button.
*You may not see all the options listed in the below screenshot depending on your Exigo Service level. As a note, General tiers will be
priced capped as they are today, Premium tiers will be billed at the rate displayed on the tier. Once you have gone into a Premium tier,
you will not be able to scale back into a General tier.
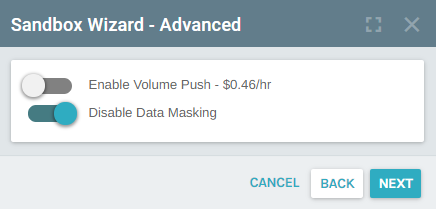
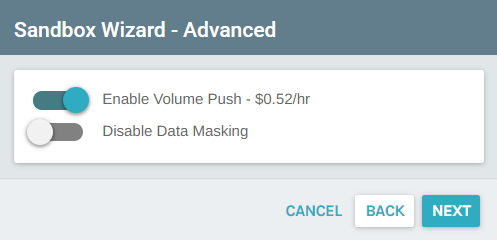
3.Configure the Advanced settings for your new Sandbox
Select the appropriate options from the screen and click "Next"
- Enable Volume Push
This will allow for commissions to run in the sandbox environment. If you will be doing any
commission testing at all, you will need to enable this option.
- Disable Data Masking
As a security precaution, Exigo provides the ability to mask sensitive information. This option will
be enabled by default. To disable data masking, click the slider to prevent masking of sensitive
information. You will know this feature is disabled when the slider shows in a blue/green color and
is showing the slide decal on the right.


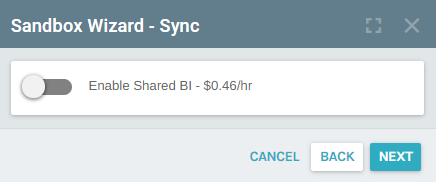
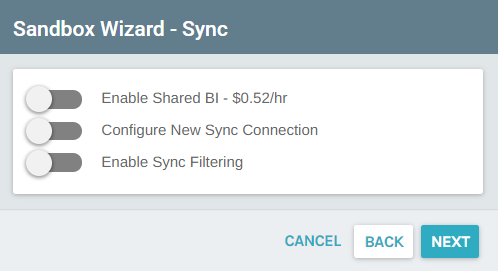
4. Select the Sync options for your new Sandbox
4.Select the Sync options for your new Sandbox
Select the necessary sync options for your new Sandbox as outlined below and click "Next".
- Enable Shared BI
This will create a sandbox reporting instance on our shared BI server. If you will be developing web
code and need a sync database to develop against, you need to enable this option. This is explained in
greater detail later in this document.
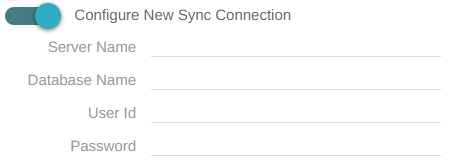
- Configure New Sync Connection
Here you can specify the destination for your data to be synced to. If you will be developing web code
and require a sync database to develop against, you need to enable this option if you have not opted
to use the Shared BI instance mentioned above.
- Enable Sync Filtering
Enableing Sync Filtering tells Exigo how much data you want to include in your sync process. This
defaults to include 90 days worth of data automatially when selected but you can change this as
needed to preserve DB space.


5. Confirm Settings and start your new Sandbox
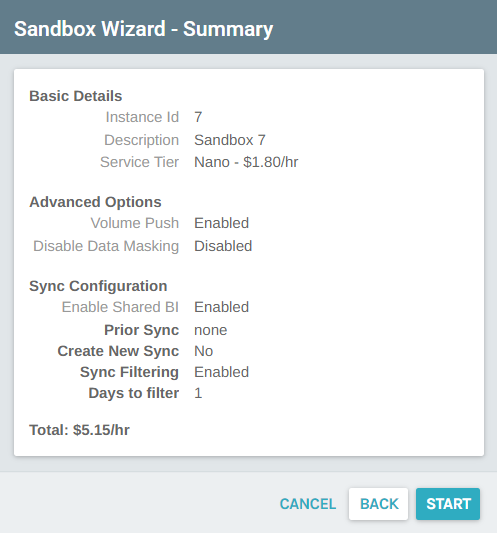
5.Confirm Settings and start your new Sandbox
You have now reached the final steps in starting a new Sandbox. Make sure that you review the options
displayed on the page. If any of the options are incorrect click back until you get to the appropriate screen
to update the options selected.
Once you have confirmed all settings are accurate, click "Start".

ACCESSING YOUR SANDBOX
To access the sandbox admin interface, please go to sandbox1.exigo.com and login with the same user
credentials that you use to access your production account. You will be able to navigate to
sandbox2.exigo.com, sandbox3.exigo.com or sandbox4.exigo.com to login to the separate sandbox
interfaces.
Please keep in mind that the sandbox is from a snapshot in time, meaning it will use the last backup file
that was created which is normally the previous night. If you have changed your password since the last
backup, you may need to login with your old one.
HOW DO I USE THE SANDBOX API?
To access the sandbox data via the api, you can use the sandbox web services found at
http://sandboxapi1.exigo.com (sandboxapi2, sandboxapi3 or sandboxapi4).
The credentials are the same.
HOW DO I ACCESS THE SQLREPORTING DATABASE FOR THE SANDBOX?
If you are an authorized Sync Database User (and licensing is Standard or Enterprise Edition), you can
connect to sandbox.bi.exigo.com.
You would use your credentials created from Administration >> Sync Database User. Your connection
string for the sandbox will follow this naming convention:
Server=Sandbox.bi.exigo.com; database=[CompanyKey]ReportingSandbox{1-3}.
For example, if I created Sandbox2 for the company ExigoDemo for UserName = TestUsers with password
12345*&, the connection string would be:
Server=sandbox.bi.exigo.com;database=ExigoDemoReportingSandbox2;uid=Testusers;pwd=12345*&
;pooling=false;
UPDATING SANDBOX DATA
HOW OFTEN IS MY DATA UPDATED IN THE SANDBOX?
Data is a snapshot in time, and you will have full control over the creation of a sandbox by starting the
Any changes to the data you have in the sandbox environment will be overwritten if you stop and restart
the Sandbox or refresh it use the provided tools.
WHAT IS THE DIFFERENCE BETWEEN START AND REFRESH FOR THE SANDBOX?
There really is no difference. When you use the START option, it will create the sandbox on the server. To
refresh the data to use the most recent backup (pulling in a copy of all data up to midnight CST of the prior
night), you could either click on the REFRESH button or STOP the sandbox and then Start it again.
Refreshing is just a shortcut to remove the sandbox and create a new one with recent backup data.
WHAT DOES NOT RUN IN THE SANDBOX?
Commissions:
By default, anytime a refresh is done in your sandbox, the commission services are disabled. This means
you will not be able to run commissions or have real time volume pushing. You will need to request
that this be enabled via a ticket request if it is something that you need. Keep in mind that we do not
recommend running the real time commission services as your data is now static.
Email Broadcast:
This service will never be available in your sandboxes.
Payment Gateways:
The merchant settings in the sandbox account will be switched from your provider to TEST MERCHANT.
This allows you to test your web applications without the danger of someone's card being charged.
UPDATES ON - DEMAND
UPDATES ON-DEMAND
Nothing is more frustrating than starting a Sandbox and forgetting to enable a setting or add a
Configuration. Previously you would need to either enter a support ticket or re-fresh the entire
environment.
Great News! All Sandbox environments will now support the ability to hot-reload their configurations and
update on-the-fly. This will give you the ability to turn on Volume Pushes, upgrade tiers or update anything
else that could have been changed at the start of the Sandbox without the need of a ticket or a full refresh.
We hope that this will serve as a major quality of life improvement to your everyday workflows.
To configure and update the Sandbox follow these steps:
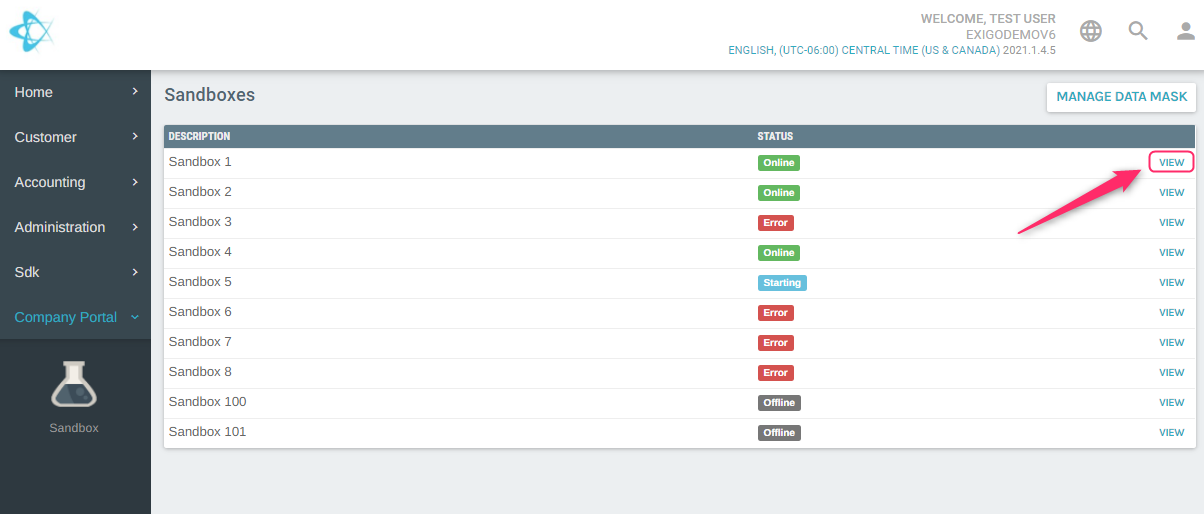
1.Select the active/online Sandbox you wish to update:
Go to Company Portal > Sandbox > Click "View" on the necessary Sandbox

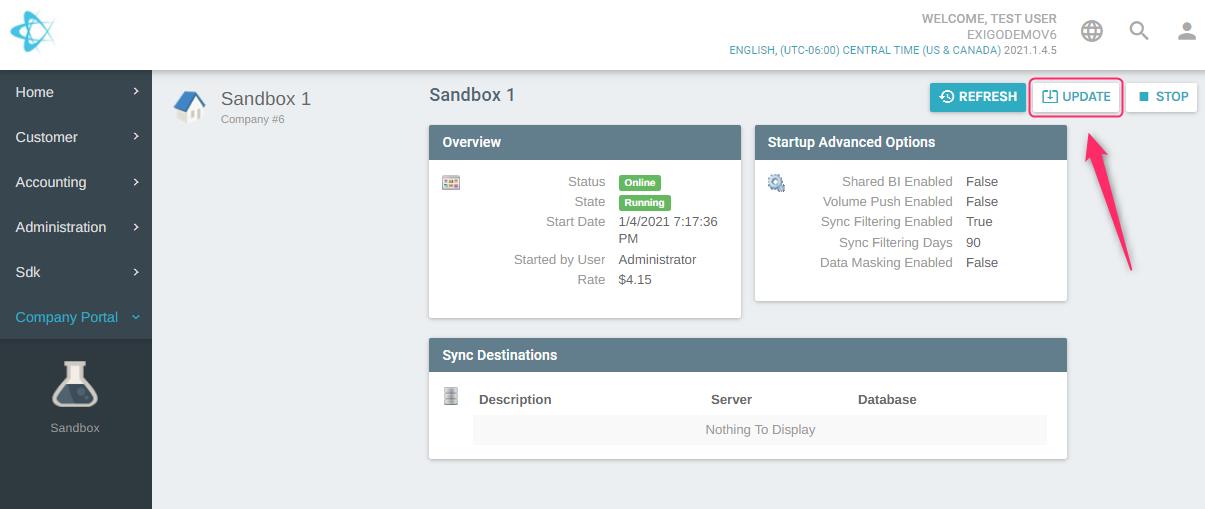
2. Click "Update" in the top right corner
2.Click "Update" in the top right corner
3. Select the new applicable Service tier for the Sandbox
Once you have selected your new Service Tier, click "Next"
* Once you have upgraded a Sandbox a Premium tier, you will not be able to scale back into a General tier.


4. Make any necessary updates to the current Sandbox configurations and click "Next"
4. Make any necessary updates to the current Sandbox configurations and click "Next"
Once you have selected your new Sandbox Configurations, click "Next"
5.Make any necessary updates to the current Sandbox Sync configurations
Once you have selected your new Sandbox Sync configuration, click "Next"
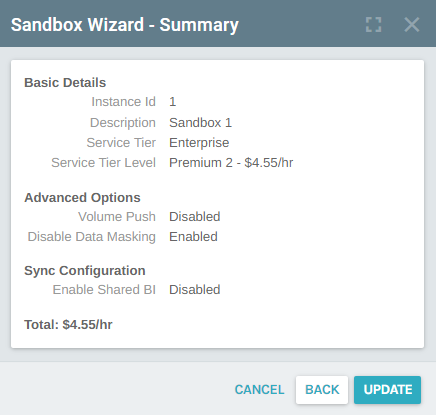
6.Review the applied changes
It is imperative that you review the applied changes and make sure they are accurate before saving. Any
changes made have the potential to increase the cost associated with utilizing the Sandbox.
Once you have confirmed your changes are accurate, click the "Update" button to apply them.